 Leadcore 101: An In-Depth examination of “pulling lead” for walleye and sauger
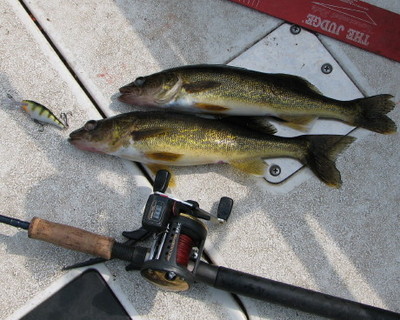
Walleye anglers must be in control of both the depth and the speed of their presentation in order to consistently put fish in their boats. One technique that can be used to target walleyes from shallow current-swept areas in rivers to the deep off-shore waters of the great lakes is trolling with leadcore line, or “pulling lead”. Leadcore line is often used as a delivery method for medium- to fast-paced crankbaits, but other baits, such as slowly-presented spinners rigs tipped with live bait or thin flutterspoons, are suited equally well to leadcore trolling. In this article, I will illustrate the methods I use to catch walleye and sauger by pulling lead in rivers, inland lakes, and reservoirs. I will describe how you should select and rig your leadcore tackle, how to deploy baits and land fish, how to manage multiple leadcore lines as part of a trolling spread, and how to identify times and locations where pulling lead can put more walleye and sauger in your boat.
Leadcore line, rods, reels, and rigging
Leadcore line is, in fact, two lines in one. The inner portion of leadcore line is a thin strand of lead. The lead ensures that the line itself will sink, but the lead affords no strength to the line whatsoever. All of the strength of leadcore line comes from the braided nylon sheath that encompasses the inner strand of lead. Leadcore line is commonly available in three strengths: 18, 27, and 36 lb test. While my days of pulling lead began with 18 lb test, I have recently transitioned to 27 lb test in an effort to rescue a few more cranks per year from cribs and snags. The color of the nylon sheath changes every 10 yards, which makes it possible to “count colors” when deploying baits rigged on leadcore…more on that topic later. Due to the amount of leadcore trolling that I do while guiding or fishing tournaments, I tend to replace my leadcore on an annual basis.
Leadcore rods should have a sensitive tip section to allow an angler to read bait action without having to handle the rod or sweep the rod forward. They should also have enough strength and backbone to be able to handle the stresses that pulling lead can place on equipment. These properties can now be found in rods having a variety of lengths, allowing an angler to deploy multiple leadcore lines while minimizing the propensity for tangles. My leadcore arsenal features three different lengths of rods. First, I have a pair of Jason Mitchell “shorty” rods (JMST5LC), which are 5 foot rods specifically designed for use with lead. Next, I have a pair of 8 foot, telescoping Jason Mitchell trolling rods (JMST80MF), which feature a very sensitive tip section and do an outstanding job of telegraphing bait action. I have also used trolling rods from St. Croix (PGT80MM) of the same length with good success. Finally, I have a pair of 14 foot Jason Mitchell trolling rods (JMST14M) that I use on those occasions when pulling six leadcore lines is required, or when I want to move a pair of baits as far away from the boat as possible without using planar boards. My recommendation to anglers who are new to leadcore is to get set up with shorter rods first, and then add longer rods as their interest in (and success with) pulling lead grows.
All of my leadcore rods feature linecounter reels. On my 8- and 14-foot rods, I have Diawa Sealine 47 reels (SG47LCA), while my shorties are equipped with Diawa Sealine 27’s (SG27LCA-W). When choosing a reel, ensure that it has solid construction to handle the physical stress of leadcore, as well as a good drag system. Although leadcore line changes color every 10 yards, I still prefer to use linecounter reels to ensure that I can precisely duplicate the amount of leadcore line I have deployed during an effective trolling pass, rather than relying solely on “counting colors”.
Rigging your new leadcore tackle with line is only slightly more complex that filling a spinning or baitcasting reel with monofilament or braid. First, the reel requires a small amount of backing: a monofilament layer between the spool and the leadcore, to prevent the nylon sheath from slipping against the metal spool. I lay down one or two passes of 10 lb test Trilene XT before I add my leadcore. Next, connect the backing to the leadcore. Knots to leadcore line are tied only with the sheath and not the lead strand. Pull the nylon sheath back to expose a 2-3 inch section of lead, pinch off the lead, and then use the lead-free sheath for tying knots. Use a blood knot to join the backing to the leadcore, neatly trim the tag ends of the knot, and then add the leadcore to your reel. The leadcore should be added relatively slowly and under constant pressure. It is also helpful to have the spool of leadcore line directly in line with the reel, so that no kinks or twists are generated as the leadcore is added to the reel. I can add about 10 colors of 18 lb test leadcore to my Sealine 47s, and about 8 colors of the slightly thicker 27 lb test lead; my Sealine 27s hold just about half as much line as the larger capacity Sealine 47s.
Once you have added the desired quantity of lead to your reel, attach a leader. Monofilament or a braid/superline can be used as a leader. I used Berkley Fireline Crystal (14 lb test) last year for my leaders and was very impressed. Fireline is more abrasion resistant than mono (which makes it a good choice in waters where Zebra Mussels are prevalent), and allows me to land more toothy critters like pike and musky than a mono leader would. Typical leader lengths range from 6-10 feet on the bodies of water I frequent, to 30 feet or more on ultra-clear bodies of water. To connect the leader to the leadcore, use a blood knot, a Willis knot, or a very small ball bearing swivel. I favor a swivel over the knots as the swivel helps to prevent messy line twists and kinks caused by a fouled crankbait or a small fish flopping on the surface behind the boat. Finally, add a small cross-lock snap using a Palomar knot, and you’re ready to go pull some lead!
 Getting down to business: deploying baits and landing fish using leadcore line
No matter which type of bait (crankbait, spinner rig, or flutterspoon) you attach to that terminal cross-lock snap, it is important to recognize that the depth achieved by that bait will be influenced by two factors: the amount of leadcore line you have deployed behind the boat, and the speed at which your boat is traveling. A primary benchmark is that leadcore line will provide approximately 5 feet of depth for every color of line deployed at 2 mph. Thus, to reach a target depth of 20 feet, I will need to deploy about 4 colors of lead if I’m trolling at 2 mph. More depth will be achieved at slower speeds, and less depth at faster speeds, due to the balance between the drag of the relatively thick leadcore line being pulled through the water and the inherent sinking action caused by the inner lead strand.
Let’s imagine that you intend to pull a crankbait on lead…perhaps the most common application of leadcore trolling. To do so, attach your crankbait of choice to the snap on your leader, place the bait in the water to check its action/tuning beside the boat, and then start to deploy leadcore from your reel. Leadcore line will deploy slowly from the reel; loosen the spool tension to allow line to be deployed at a reasonable pace. Be aware that when line is deployed too quickly, a leadcore bird nest may result. Such bird nests are not only challenging to fix, but they also shorten the lifespan of the leadcore line itself, as kinks in the inner lead strand can easily penetrate the outer nylon sheath. Patience in deploying baits is a virtue and will help keep your annual bill for leadcore line to a minimum. I will often deploy baits at a faster speed than I intend to troll (keeping in mind the depth/speed benchmark noted above) to get the desired amount of line into the water faster, and then slow my troll down to my target speed once all baits are deployed. Once you reach your target speed in the area you want to fish, adjust the amount of line deployed to keep the bait at the desired depth. For example, if I am whacking bottom constantly at 20 feet deep with 4 colors of lead and a boat speed of 2.0 mph, I will crank up a few turns of line to eliminate most bottom contact (although, sometimes stirring the bottom up can be an effective way to trigger bites, especially from sumo Mississippi River sauger). Once you have your bait at the right depth , moving at the right speed, over or near the right structure, it’s time to place the rod in a holder and await the bite. Adjust the rod tip so that it is parallel to or pointing towards the surface of the water; doing so will eliminate some of the belly of slack line that can develop between the rod tip and the surface of the water.
When a fish bites, it is not generally necessary to set the hook; the forward motion of the bait and the action of the rod is normally enough to drive the hooks home. Part of achieving a good hookset is the drag setting on the leadcore reels. I have my drag set “snug”, which means that I can only remove line against the drag with a slow, steady, but forceful pull. It is this resistance that will assist in setting the hooks. A drag that is set too loose will result in more lost fish. While I tend to not change my drag setting, there are times when I will give a pronounced hookset when pulling lead. These times tend to be when I am pulling lead slowly, early or late in the season during the cool water periods. Such a slow trolling speed will sometimes not generate enough resistance for hooks to be set snugly without some assistance from the angler. A smooth, forward sweeping hookset is all that is required under these circumstances.
When landing a fish, a moderate paced, steady retrieve is all that is required. Resist the temptation to “pump and crank” or to reel so fast that the fish starts to ski on the surface, tens of yards behind the boat. The steady retrieve will ensure that the leadcore line is laid down evenly on the reel, which will be helpful when you redeploy the line after the fish is landed. Also, because leadcore line has no stretch, you want to ensure that the rod has the opportunity to absorb any surges or headshakes made by the fish.
 Leadcore’s place in a trolling spread
When fishing with a guest, a tournament partner, or a client, I will often incorporate a number of leadcore lines into a multi-line trolling spread. In Wisconsin, where three baits are allowed per angler, I will routinely pull six baits when fishing with one other angler. These six baits will be rigged on a combination of leadcore lines and flat lines (often four leadcore lines and two flatlines), but sometimes on as many as six leadcore lines. Managing this number of lines and baits requires patience and attention to detail, if you intend to spend your time on the water by landing fish rather than by untangling nasty leadcore snarls.
Rod length and position within the boat are primary contributors to successful inclusion of leadcore lines in a six-line trolling spread. Your “shorties” should be in holders at the corners of the boat, where the gunnels intersect the transom. While you may choose to point your shorties straight back behind the boat, I normally have them pointed at a slight angle, perhaps 30 degrees, so that there is some bend in the rod. This bend will allow me to read the action of the bait, and will also help to increase hooking percentages. The next rods in the spread will be your eight-foot “middle” rods. These will be pointed directly out the sides of the boat, at 90 degree angles to the gunnels. Finally, your most forward presentations can either be a pair of flatlines (rigged on long rods, like the St. Croix Wild River WC106MMF2), or a third pair of leadcore lines rigged on long leadcore rods, like the Jason Mitchell 14-footers.
When setting up a typical trolling pass, my partner and I will start by deploying the flatlines. I often run smaller baits on the flatlines, like a #5 shad rap or #5 jointed shad rap. We run these baits 175-225 feet behind the boat. With that amount of line deployed, these small baits will run at moderate depth (10-14 feet) and be far behind the inner spread of leadcore lines. I run a pair of flatlines to target any high-riding fish that leadcore presentations (often in the lowest 5 feet of the water column) would miss. When the flatlines are deployed, we add the middle leadcore rods to the spread, deploying those baits off the sides of the boat. Finally, we add the inner “shorty” rods, taking care to ensure that these baits are deployed straight behind the boat and not tangling with the middle leadcore lines. As long as your boat is moving in a straight line and your baits are all in tune, you should be able to deploy six baits in this manner without getting tangled. Likewise, you can keep your lines untangled longer if your turns are wide and gentle, rather than fast and sharp.
When you start picking up fish with your trolling spread, it is important to land the fish in such a way that tangles are avoided. Thus, if you hook a fish on an inner “shorty”, keep that rod tip pointed out the back of the boat, bringing the fish to the boat directly behind the motor. A quality landing net with an extendable handle, like the Beckman BT222863, will make reaching for those “shorty” fish a bit easier. Keep fish hooked on the middle and forward rods off to the sides of the boat by maintaining a 90 degree angle between the rod and the gunnel, and net the fish at the side of the boat rather than out the stern. When a fish is hooked, do not throw the motor into neutral. Doing so will cause all of your remaining leadcore lines to sink and potentially get snagged or tangled. Unless you perceive that your fish is exceptionally large, keep moving forward at your original speed. Should you decide that a moving boat is placing too much stress on a hooked fish, quickly reel in your remaining leadcore lines before throwing the motor into neutral. You’ll be surprised at how many doubles (and triples!) you will experience when you leave the rest of your baits in the water while landing a hooked fish. You’ll remember your first “quad” for years to come!
 When and where to pull lead
I pull lead successfully in rivers, lakes, and reservoirs. Rather than being a one-dimensional, deep-water technique, my experience with leadcore has taught me that pulling lead is as versatile a technique as other classic walleye presentations. I will leave it to you to discover how to best incorporate leadcore trolling into your walleye angling arsenal. However, here are a couple of hints to get you moving in the right direction. First, anytime fish are scattered along a deep flat in a lake or reservior, break out the lead. Second, anytime fish are scattered along in a current swept, washboard bottom in a river, it’s leadcore time. Third, anytime fish are located tight to a steep dropoff, either at its base or along the face of the drop, leadcore can help those fish find the bottom of the Beckman.
In closing, allow me to make a recommendation regarding a consistently hot bite that will help you move from a leadcore novice to an experienced puller of lead. Lake Pepin hosts an outstanding leadcore bite for walleye and sauger once summer water temperatures rise into the upper 60s to 70s. Fish will orient at the base of near-shore drop offs in 22-25 feet of water. Use the wind to your advantage: pull lead along the base of the drop that is catching the most wind, and troll with the wind rather than into it. Pull baits from 2-3.5 mph (or faster), and vary the types of baits deployed until you find the hot colors and bait styles for that particular trip. I guarantee that you’ll have enough positive reinforcement from Pepin’s walleyes and saugers to help you gain experience and confidence in pulling lead.
So, get out there and pull some lead this season. Let us know how you’re doing, and feel free to drop me an e-mail at [email protected] with your leadcore questions and success stories!
Additional leadcore resources
For knots such as the Blood knot or the Palomar knot, check out this link.
For the Willis knot, check out this link.
For all of your leadcore equipment needs, from rods to reels to leadcore line to snaps, contact Dean Marshall at Everts Resort (715-792-2333). Dean only carries leadcore gear that is extensively field tested and approved by avid leadcore trollers. Dean will be happy to assemble a complete leadcore trolling package for you, and also offers a unique "fish before you buy" program that will allow you to test drive your leadcore equipment before purchase. If you can’t make the trip to Everts, Dean will also cheerfully ship your new leadcore trolling gear to your door.
For the world’s best walleye net, especially for trolling applications, check out Beckman Nets. The extending handle on my BT222863 net is perfect for reaching out and scooping big walleyes that are flopping around on the surface, just out of reach of a conventional net. Beckman nets are also available at Everts Resort.
Finally, for some hands-on instruction in the art and science of pulling lead, consider a fully guided walleye trip with my guide service, Jason Halfen Outdoors. I offer full-day and half-day trips for walleyes (and/or smallies, if you are so inclined), and spend part of many trips by pulling lead. You’ll have the chance to learn how to rig lines, set up a trolling spread, control the boat, and of course, crank in a bunch of fish. Drop me an e-mail ([email protected]) when you’re ready to enroll in "Leadcore 101".
Thanks for the info Jason.
I’m thinking about trying this and have been reading all
I can find on the subject. Thanks for condensing it for
us.
The only question I still have is how to factor the dive
depths of a specific bait.
I haven’t seen where this is factored into the equation
with the 5 ft. of depth per color at 2 m.p.h.
Is it all trial and error based on length of leader and
the dive of the bait.
Thanks again!!
Nice read Jason. Very informative.
took lead core 101 with you this last summer and I gotta say it was a blast!!!
Very nice read ,kinda makes one to want to give it a try now.


Dan, you are correct in thinking that a diving crankbait will achieve more depth than the “5 feet per color” guideline. For example, while a husky jerk or rapala floater might require 4 colors of lead to tick bottom at 20 feet with a boat speed of 2 mph, a #9 shad rap might require only a touch more than 3 colors.
How much do the diving characteristics of an individual bait impact on ultimate depth on lead? Tough to predict. I mostly discover that by putting the baits in the water and finding out for myself. But, in general, the more aggressive the dive curve is for a particular bait, the less leadcore line you’ll need to reach the target depth.
Thanks!
Outstanding article Jason The details are spot on!
Jason, Thanks for an outstanding article, well written. As for Dandorns question as to bait depth. Might I suggest you get the 8th addition of “Mark Romanacks” art of trolling it takes all the guess work out of depths your baits run at.. Hope this helps.

Great article Jason

Nice article Jason & very well written might I add!

Great read Jason. Sounds like you got it dialed in.
Great article Jason!

 I wish I would have been able to read something like this when I started pulling lead. I would have had a few less tangles, a few more crankbaits, a lot more fish and a few less headaches!
  Jason is spot on in this article and you can tell he has mastered the art of leadcore fishing through his own personal experience!
Jason,
Great article!! And may I add I agree with Brad that I wish I could have read an article as good as this a long time ago. It would have spared me all the headaches I went through for a few years on my own. Also Jason all the articles and videos you do are very very imformative and useful to me and my fishing. Glenn
Thanks for all the positive feedback guys

Thats a great article Jason, your videos are also very informative, I like your style, no nonesense straight forward in formation. Last year I started attaching my leader to my lead by pulling out 6 to 8 inches of the lead center then tying a broad over hand knot and sliding the leader inside the leadcore sheath and up and around the over hand knot til it meets the lead center. Then roll the overhand knot down and tighten right down to the end of the lead core.Its nearly a seemless way to attach the leader to the lead.
Great write-up Jason! This really helped me understand some of the finer points of running LC… Thanks.
Water’s warming up….it’s leadcore time!
That’s the way I tie on a leader too.
-J.
This is called a Willis Knot… Jason linked this knot in his article. Works extremely well and is very easy.
The 2009 leadcore season is underway!