Forum Replies Created

Viewing 25 posts - 1 through 25 (of 25 total)
  • StonyEye
    Posts: 31
    #2029329

    I had a ’98 Lund. It had 3 factory wires for the 12/24 volt combination plug, it also had factory wires for volt meters for each battery. Of course I had my own wires run from On Board Charger and ran my graphs off trolling motor batteries. I would use my multimeter measuring ohms to find out which wires went where I needed them (you will probably have to make some long test leads to reach both ends of the wires). Then when you think you have it wired how you want it, make sure you have correct voltage before connectiing trolling motor and accessories.

    It will be a pain in the ass, but worth it it long run. mark wires so you will know next time.

    Good Luck.

    StonyEye
    Posts: 31
    #2019908

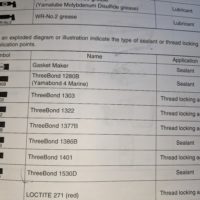
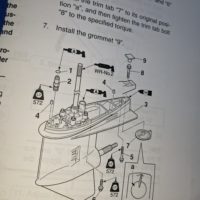
    I am asking because it shows it in “Genuine Yamaha Service Manual” otherwise I would have never thought it was needed.

    Pics enclosed.

    Attachments:
    1. Chart.jpg

    2. Diagram.jpg

    StonyEye
    Posts: 31
    #1976026

    I use race drivers to install new races. I use a 1 inch Dia. Brass bar and a BFH to remove races.

    StonyEye
    Posts: 31
    #1973062

    Wood may not last a life time, but it sure is affordable. I replaced a transom in a ’86 Lund about 20 years ago. Pretty easy. Pulled motor using a cherry picker. Cost of Marine grade plywood back then around 80 dollars a sheet for 3/4″. I cut it in half and glued the two halves together to get thickness I needed. I replaced pumps, paid dealer to redrill motor mount holes. With all the stainless steel hardware I used, probably cost around 200 dollars to do the entire job back then.

    StonyEye
    Posts: 31
    #1951993

    I did add vent holes to prop. Looking for any other suggestions.

    StonyEye
    Posts: 31
    #1951938

    I cannot help but ask same questions. Is your livewell full? Do you have people in your jump seats? If so, what hole is your motor mounted? What prop are you running? Do you have 200 lbs of jigs in your bow storage? By myself, with no water in livewell, I love driving my WX1910, but….3 people in my boat, water in livewell, what a dog of a hole shot! I wish I could put my trolling motor batteries under rod storage, I do believe that would not only help hole shot, but it would fish with a more level atitude.

    StonyEye
    Posts: 31
    #1940517

    I had the same configuration about 15 years ago. Boat had 12V motor, enough power for light hull, but if I fished all day, battery life was too short. Installed two batteries in parallel, also installed on board charger, never had to remove batteries again.

    StonyEye
    Posts: 31
    #1939963

    I feel your pain. Skeeter’s website does have a contact phone number on it somewhere. I used it because I didn’t even want to talk with dealer I used (no it was not The Boat Center), but was referred back to dealer by a Skeeter Rep. I let the dealer who sold me the boat try and redeem themselves, they failed. I bought my boat Sept 2017, Spring 2020 I believe I have all the leaks resolved.

    I will say that “The Boat Center” has earned a great reputation. I stopped in at Ramsey, Dean Marshall showed me the boats and after that, I made up my mind that I was going to buy a Skeeter. I was never able to seal the deal with the sales rep I worked with there, I went elsewhere.

    I bought a 2017 WX 1910 with 200 Yamaha. The things that were not right, were mostly as you say “papercuts” small little things. Some of them were dealer inflicted, some of them were factory inflicted, but I will never say that the Skeeter hull lacks quality. Issues I had were in assembly of thru hull fittings, quick connect on the tubing, missing Oring and a few other minor details that all added up to a gallon or two of water in boat everytime I used it. I have found some nylock nuts on windshield not tightened all the way too. Disappointing at best when you spend the amount of money that a new boat costs. The two things that bothered me the most were the bait well overflow hose was kinked, now I can see how that easily would have happened on assembly, but I told my dealer that baitwell was overflowing right out the top and that I could not get an electrical fish wire through the overflow, dealer told me I had the water inlet valve open too far. I had not found the kinked hose yet, thought wow Skeeter engineers aren’t smart enough to design overflow to be able to handle input from pump. I will never know if dealer was too lazy to look or if they saw hose and were too lazy to fix it. When weather got warm and minnows were dying from lack of fresh water I pulled panel and found kinked hose, Skeeter happily sent me a new hose, no problem. Baitwell works great now, it cannot fill faster than overflow drains, a Skeeter Dealer should know that! Other thing was that when they installed graph transducer they used a transducer mounting plate, then mounted transducer with screws that were twice as long as the transducer mounting plate was thick. I was livid! Skeeter didn’t bat an eye, people drill holes in transoms all the time. But they drilled unnecessary holes in the transom of my brand new boat. All I got from dealer was “Sorry, I’ll talk to my guy about that”. It has been a process of having to make sure boat stays dry when I went to look for leaks, often I am dumping bait in wells, making a long run over waves unsure of how much water was from splashing and waves. Go out on bluebird day with a flash light to see water seeping, dry towels to wipe up water to distinguish that it is actually leaking where you think it is and do not put water in baitwell or livewell until after you have eliminated all other leaks. Skeeter has always been good about covering warranty, and Skeeter Dealers have always been happy about doing the warranty work. After the kinked overflow hose and the holes in my transom I will never go to Dealer I bought boat from for anything.

    I have no dealer close to me so I took it upon myself to get the boat dry.

    Motor has never had an issue.

    Trailer is a EZLoader, last year Skeeter put their boats on them. Welds are cracking at fenders, front and back of fender, left and right side of trailer. E Z Loader sent me new stainless Steel Fenders under warranty. Not happy about problem, but happy with how warranty issue was handled.
    StonyEye
    Posts: 31
    #1926573

    My WX 2019 leaked at motor mounting bolts.

    I also had baitwell overflow tube kinked, must have been kinked on boat assembly. Baitwell would overflow right out the top if fill valve was open all the way.

    I am still getting water, but these two issues appear to have been resolved.

    StonyEye
    Posts: 31
    #1916577

    I have the same issue. A friend of mine had the same issue. Really unimpressive.

    StonyEye
    Posts: 31
    #1912165

    I have dealt with a few leaky Lunds in my days. Plug off the livewells so you can eliminate that. If you arrive at the conclusion the hull is leaking, you can put some water inside the boat via garden hose and watch for water leaking out. Do NOT put too much water in, it is heavy and I have heard of people blowing tires. I have safely put a few inches of water in boat. I had a ’83 Pro Angler that had one very loose rivet, when it was seated into boat, it hardly leaked. When it was pushed to the out side of boat, it would leak fast. I had a ’98 1660 ProV that leaked, sometimes a lot, sometimes not. It took me a few years to find the leak, or did it take a few years for the leak to get bad enough to find, I will never know. Sometimes when you go out, it is smooth water and your boat is not flexing like when you are bouncing over waves. Many things to take into consideration. If your 1775 is like my 1660, then your livewell pumps are in the floor between the seats. That is where my pumps and valves were, another spot I would watch when looking for the leak.

    Good luck!

    StonyEye
    Posts: 31
    #1851220

    I used to own a 1998 Pro V 1660. The levers for livewell move a cable. In my boat the Valves and pumps were under a compartment just behind the front livewell. Remove screws, lift up small section of floor. Then you can inspect your situation and take it form there.

    Water in your boat could be coming from cracked livewell tubing, loose rivets in hull, ect….

    1000 dollars? Way too much!!

    StonyEye
    Posts: 31
    #1797363

    Sorry, no pics. The boat is 300 miles away from me now.

    Lower Rectangle fits in bottom of boat. Put T’s in it angled inwards/upwards for the uprights. Top is very skinny rectangle with T’s in it angled down in direction to meet uprights. Uprights I never glued in place, those come out to make unit easy to store. I pieced it together, marked PVC with marker for T orientation, then glued everything but the uprights. I used 3/4 inch pipe, I think if I did it again I would use larger size. But this has held up for over 20 years (doesn’t ever see the sun).

    I hope that is enough to give you an idea. Good thing is PVC is cheap, so if the first does not work, alter your design and make another.

    StonyEye
    Posts: 31
    #1797336

    I would look to Cabela’s, Overtons, Fleet Farm.

    Long story short. I used to deal with same basic boat, ’83 Lund Pro Anlger, came with a very nice custom cover, fit real tight, built a support structure out of PVC pipe, did not glue all the joints so I can take it apart and store for the Summer. My nephews have this boat now, they are on the thirdcover for it. Their cover is loose and baggy, I would think they could have found a better fit, but they are still using the same PVC frame I made back in the late ’80’s. I keep telling them to modify or start over with structure design, they just stack bricks underneath PVC frame to lift it more. I always put one of those silver tarps over the top of the canvas top for the Winter, made it much more waterproof. I was always able to brush the snow off of it during the Winter, so weight build up was never an issue. Biggest thing is make sure you do not have low spots where snow/water collects.

    OK, so story not so short. Bottom line, you should be able to find a off the shelf tarp and make a support system of some sort.

    StonyEye
    Posts: 31
    #1766862

    Spring of last year I had a new cover sewn up for my ’97 1660 Pro V. It was $650. Much shorter and narrower than a Skeeter. I would think the larger boat would cause the price to be comparable to the Skeeter cover.

    I do own a Skeeter now, when I picked up my boat I was told that towing with the cover on was not recommended due to the cover dulling the clear coat. So you guys are towing with the covers on and not having and issue? I like travelling long distances with the cover on, keep weather out and sticky fingers out when stopping for food.

    StonyEye
    Posts: 31
    #1760702

    I would also be more worried about the total power that the plug has to dissipate which is Watts=Current x Voltage. But also remember that Voltage=Current X Resistance, which means that Power = Current x Current X resistance, which means that power increase to the square of current, in other words power is increased dramatically by increasing current. Just something to keep in mind. You should be able to google the wire size needed for the current and distance you run your wires. I work on some electronic/robotic equipment, I can tell you from personal experience that a 125 Volt 8 Amp fuse blows consistently in an instrument I work on that comes from the factory with 250 Volt 8 Amp fuse, so it isn’t just about amperage rating, voltage also plays a role, and I verified that with an electrical engineer.

    I happen to have a Skeeter WX1910 that I bought with the Minnkota upgraded to a 112 Terrova, I will look to see what rating plug was installed and let you know what I have either tonight or tomorrow.

    StonyEye
    Posts: 31
    #1750878

    Onboard Chargers are well worth it! The size depends on how often you fish back to back outings. I myself would not want to be lass than 10 Amps per bank, but know people that get buy with just 5 Amps per bank. I would definitely put the charger your starting battery, today’s electronics suck quite a bit of juice and if you fish at night you are running lights, along with other boat accessories. I do not know what size your outboard is, but because you are getting by with a 12 V trolling motor, it probably isn’t too big. My last 60 HP motor only put out 5 amps at WOT, so unless you are running a long ways you are not recharging your battery all that much. Plus with the onboard charger on your starting battery you will also be able to know that you started with a fully charged battery as they have lights that will tell you if your battery (when plugged in) is fully charged or not.

    StonyEye
    Posts: 31
    #1750173

    I just installed 4 batteries in the floor of my WX1910. 3 27’s and one AGM 31. The front two batteries hang over a little bit, I will definitely be keeping my eye on them for the first season to make sure they stay put. I used the Aluminum trays that came with the boat, purchased one more from R and R Design.

    I fit the 3 bank Minnkota 345PC and a 110PC in the starboard hole under the jump seat. They are mounted on the interior side of the hole.

    StonyEye
    Posts: 31
    #1058279

    I won’t get into Brands. But I will say after having 2 3 bank chargers go out, I have gone to 2 chargers, a small 1 bank for my starting battery and a powerful 2 bank for my trolling batteries. Many people may not need the starting battery charger, but I spend a lot of time fishing smaller lakes. So I may be fishing for several hours in the dark, using lights, livewell, graphs ect, then it is only a short ride back to the ramp, so starting battery gets little charge from outboard. So I like knowing the starting battery gets charged fully. I spliced the incoming power lines together so that I still only need 1 extension chord. Splice is wire nutted, filled wire nuts with silicone, taped them up, then wire tied them up high so they won’t get wet until just before the entire boat goes under.

    StonyEye
    Posts: 31
    #863360

    I have had the same issue. I use Tri-Flow on my pedistal bases, it will leave Teflon behind after it dries. I also will stick a forceps or needle nose to hold the locking tab in while I am removing the pedistal, so that so I can focus more on lifting and rocking the seat pedistal loose with both hands and I am not bent so far over.

    StonyEye
    Posts: 31
    #856829

    I love mine!!

    Not only does it keep your trolling motor from beating itself up while you are running accross water or down the interstate, it keeps the trolling motor from stressing where it mounts to the boat also.

    StonyEye
    Posts: 31
    #856825

    I had two 3 bank chargers, both of which failed, I won’t go into that, but because it was only one bank at a time that failed, it sucked to go to the expense of replacing the whole charger. What I did was purchase a high performance two bank charger for my trolling motors and a small single bank charger for my starting battery. I spliced the two power inputs of the chargers together, so that I still have only one extension chord to plug in ( good splice, with wire nuts, plenty of electrical tape, and wire tied this up under the gunnel so it would stay dry and free from getting pulled on). This also allowed me to mount the starting battery charger near the starting battery and the trolling motor battery charger near the trolling motor batteries.

Viewing 25 posts - 1 through 25 (of 25 total)