I just did this repair and wanted to add a few comments. The parts list is accurate:
Valve Seat 69G-4382G-00-00 = x2 (two)
Main Spring 69G-43853-00-00 = x2 (two)
Filter 69J-4381C-00-00 = x2 (two)
Spacer 69G-4388F-00-00= x2 (two)
I’d also suggest picking up one of these filters when you order the above parts. It is the large filter under the main housing covering all of the small hydraulic parts. Mine was almost completely deteriorated.
69A-43816-01-00 = x1 (one)
I ordered from Crowley and they had all but one of the parts. You might have to order from multiple sites to get all the parts. There are limited amounts of these parts, so expect to wait a few weeks for some of them.
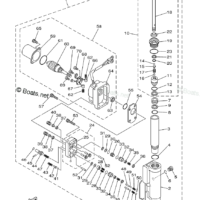
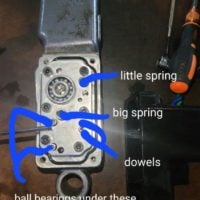
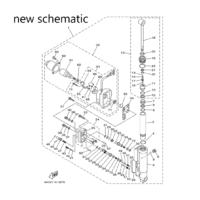
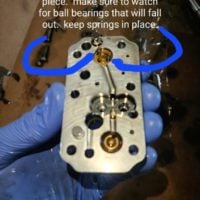
As far as the repair itself is concerned, disassemble in a box or something with edges so parts don’t hit the floor. I’d suggest taking pictures from multiple angles of each piece as you take it apart as well. I drew a picture on cardboard and taped each spring, dowel, bolt, ball bearing, and valve to it so I knew exactly where things should go. This was valuable during reassembly. If parts randomly fall out, check the schematic for help. I’ve also attached some pictures for reference.
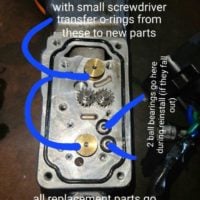
One commenter noted difficulty removing the two brass colored valves in the main housing (where all replacement parts are installed). I used a very small screwdriver to push the center pin in and pried it out. It took some force to get it to move, so be careful as you don’t want to lose the center pin part of the assembly. Everything else is replaced, with an additional spacer added in (#72 on the newer schematic). You will see the holes in the small filters under these brass valves. That is the source of the problem. Install the new filters, spacers, springs, and valves. Remember to transfer the o-rings and the center pins from the old brass valves to the new ones (which are a bit shorter). Reassemble in reverse. Make sure two springs and two ball bearings go in the two holes surrounded by small o-rings. Also, make sure the two tiny springs in the middle section are set in place before attaching the middle section to the main section (see picture). Once the middle section of the assembly is back in place, the remaining springs, ball bearings, dowels, and allen bolts can be reinstalled. If you purchased the additional filter, that would be installed next before the main black housing is bolted back in place. Message me if you have questions. It is a challenging repair, but fairly quick if you have all the replacement parts on hand.
