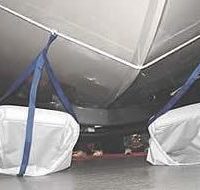
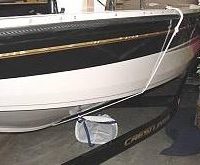
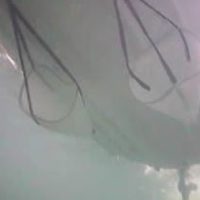
I used the system described in the following article for several years and it worked great. The bags hang under the front of the boat and are hooked to the front cleats on each side. Any bags work……I used Cabela’s.:
THE TAMER TROLLING SYSTEM…IN THE WIND AND IN CONTROL
If you’ve you ever trolled in the wind, you know how frustrating it can be. The bow of your boat blows off line, forcing you to speed up to get back on line. Take your eye off the bow for one second, and it happens again. Sound familiar? Cross winds, head winds and waves will wear you out – but there is something you can do to get back under control.
Recently we at Tamer began testing a new trolling technique using two Wave Tamers to stabilize the bow. For small boats and engines 100 hp and smaller, we recommend two 30″ Wave Tamers. For larger boats and engines above 100 hp, we recommend two 40″ Wave Tamers.
The trolling bags help anchor the bow so the wind doesn’t affect it as much, which results in much better handling. Several tournament pros were instrumental in developing this technique, and perfected the rigging during numerous PWT and RCL walleye events. Special thanks go to Johnnie Candle and Jim Carroll of North Dakota. The system has since caught on, and has received high marks from all the pros using it.
Here’s how to rig up for the Tamer Trolling System. With your boat on the trailer, take a length of 1/2″ limp nylon rope or soft dock rope, make a 6″ loop on one end, then fasten it to your mid ship cleat. Run the other end under your boat, up to the other mid ship cleat, and tie it off as tightly as you can. Next crawl under your boat, and with a marking pen, mark the rope where it meets the keel in the center of the hull. Now make two more marks approximately 14″ on either side of the first mark.
Next release the rope and pull it from under the boat. Run the rope through the loop on your Wave Tamer until it contacts the outside mark. Tie a simple over-hand knot, making sure the loop of the Wave Tamer is in the center of the knot. Repeat this process on the other outside mark. Pass the rope and bags under the boat and reattach as before, paying close attention that the bags are an equal distance apart on each side of the keel. You may have to adjust the loops to make sure they’re rigged evenly.
IMPORTANT- Both rope ends must be attached to the cleats when you deploy your trolling bags. You must be able to drop the bags over the front of the boat with both loops fastened to the cleats. BE SURE THE MOTOR IS IN NEUTRAL!
To deploy the trolling bags, stop your motor and fasten the loops to the mid ship cleats. Drop both bags over the front of the boat. You can be sure the rigging is in place by pulling the rope as tight as you can and tying it off.
To retrieve the bags, STOP the boat by putting the motor in neutral to release tension on the rope. Go to the short end of the rope and begin to pull in your bags. Be sure both loops are fastened to the cleats, so there’s no loose end to deal with.
The Tamer Trolling System. It’s another innovative new technique from Lindy that’ll help you tame the elements, and put more fish in the boat.
I couldn’t get the pictures in the article to copy but if you want me to send you the article with the photos let me know.


