This is something that I would like to become more efficient at for consistency. There are tons of youtube vids and computer geek shooters that read and tell without ever getting out in the field. Very curious on the details of what method is used by guys like Jeff that do the long distance shoots where consistency is everything
IDO » Forums » Hunting Forums » Shooter’s Test Bench » Annealing Brass –
Annealing Brass –
-
January 12, 2014 at 11:28 am #1352221
Annealing can be another controversy subject but at the end the basics needed are easy to accomplish.
Why anneal?
First it – Saves brass
For folks that tend to shoot a lot and reload annealing extends the life of the brass. Every time we resize and or fire the round we are work hardening the brass. As this process happens the shoulder area become harder and does not set back as easy from one loading session to another, in turn your process of maintaining 1 to 2 thousands set back for your head space becomes more difficult to maintain.
The other, is as the work hardening effect takes place your necks will start to crack or split from resizing and firing, then you now have a piece of worthless brass, (save these for your test pieces) for setting up your annealer.
Second it – Improves consistency in accuracy.
Pretty much what it states, being able to have brass that resizes from one piece in the batch to another almost identical and being able to see what your small adjustments make while working your brass.
The benefits that also can attribute to annealing is what folks will see when seating their bullets, the neck tension will be very consistent through the whole batch, as you press the bullets they will all feel the same and with about the same amount effort as when the brass was new, think about this the same reaction takes place as pressure builds on the release side when firing. This is the reason some folks lube their bullets or inner necks on the brass prior to seating bullets so as the pressure builds they can get a more consistent group down range – bullet to case lubing is another subject on its own
This in turn allows the shooter to have a batch of bullets that will group within a given area as long as all steps of loading and as well shooting follow through as well – accuracy in a rifle is only as what can be achieved by the rifle, load and the person pulling the trigger, let alone have to deal with the weather conditions as well.
Annealing brass
This is heating the area where the neck contacts the shoulder, in turn softens the area of the neck and the shoulder area. This is your area to focus on nothing else
The sides of the brass and especially the case head area (the bottom area that holds the primmer) need to stay hard. Repeat you do not heat or anneal the sides or base (case head area) of the brass.As stated by Randy there are a lot of computer key board annealers in this country, some mean well and some go off of my biggest pet peeve, (passing on info only on assuming, heard from a friend who heard from a friend and key board freaks after a few drinks)
I keep it very simple
Focus the flame in the correct area
Use a few damaged or aged pieces of brass for test purposes when setting up
Make sure your outside and inside of you necks are cleaned up – for consistency again
A light polish on a rag will clean up the outside neck area
A brush used in your prep system will do a fast cleaning of residue on the inside
The cleaning process should already be done while cleaning and resizing your brass prior to annealing.Setup your system with a test piece and fire up the system — shut off your lights pull the shades whatever but get the room fairly dark, as you apply the flame to the correct area watch from the top side and keep it in the flame until you see the inside of the neck area starting to turn a dull red- burgundy color its done.
At this point mine drop into a cardboard box to cool down. Some folks say water, none of us around here use water. With that said the two common annealer companies do not require water either.I keep records with mine on what each caliber averages, speeds up the setup time later on, I mark my info right on the box that catches the warm brass (average seconds needed) 338LM, 260, 6.5×47 etc.
If you have large amounts of brass that when weight sorted for loading purposes with a wide range in the weight of the brass then run a test piece through to make sure the very light pieces don’t have a chance of turning bright orange on the inside versus the heavy brass – this only becomes an issue when there is a huge spread in brass weight due to multiple manufactures or of the sort. This does not have to be rocket science or technical just a little common sense as far as weight differences and batches, just watch the color
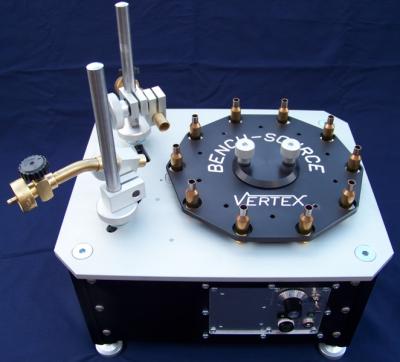
I bought a Bench Source for all of my work –works great
My shooting partner has a Giraud annealer – works great but the Bench Source has it beat a little
I use a homemade powered arrow spinner / holder and a hand held torch for doing the 50 BMG
We have come to the point that we anneal every time after sizing the brass, just another quick step in the process of accuracy and fun stuff shooting
Pictures shown
My annealer with a few pieces of 338LM test brass
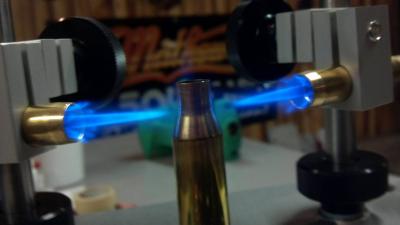
Flame position aiming to the area of the neck and shoulder, when in the flame the brass spins on the Bench Source – nice
In the dark, looking from above checking my time setting and watching for the dark red burgundy color inside the neck area as its heating up – my 338Lm brass averages 3.8 seconds flame time with the two torches
A finished piece of brass — a special note annealing is not about the color change on the outside, pay attention and watch for the dark red – Burgundy color when in the flame on the inside of the brass neck area, then you have it right. This is a lot easier and more accurate than using temp paints that melt and change color due to heat changes but also as the flame hits them. That’s why I prefer the simple tell all signal and that’s the Dark Red – Burgundy color signal. Not bright orange before pulling out.
Hope the info helps
Cheers
Jeff


 January 12, 2014 at 4:50 pm #1352227
Jeff, thanks for putting this together!
 Exactly what I was looking for. Couldn’t believe how many cordless drill/socket videos i saw on youtube. I could never imagine that they would get great consistency with that.
Interesting point on the heat paints. I wouldn’t have thought that they would vary as much.Besides the cost of the machine, any accessories that need to be considered?
January 12, 2014 at 5:49 pm #1352229Quote:
Jeff, thanks for putting this together!
 Exactly what I was looking for. Couldn’t believe how many cordless drill/socket videos i saw on youtube. I could never imagine that they would get great consistency with that.
Interesting point on the heat paints. I wouldn’t have thought that they would vary as much.Besides the cost of the machine, any accessories that need to be considered?
Just a couple of propane tanks and something to ignite the flames, an old fashion cutting torch lighter works better than a cig lighter.
cheers
January 13, 2014 at 8:10 am #1352238Who makes your annealing set up Jeff? My little borther has been looking at doing this also for our >308 round. I wouldn’t mind getting him on for Birthday – Xmas being he helps me so much. Also on a side note.. Anyone else us and ultra sonic cleaner for their brass yet too?
January 13, 2014 at 8:41 am #1352239January 13, 2014 at 9:30 am #1352242Thanks! We might have to go in together and get one. That sure looks slick. Can’t get easier than that.
January 26, 2014 at 11:51 am #1352414Great post Randy and great response Jeff.

Answer me this: several that I know say that because they’re also shooting their ammo(say.243)in the same rifle, that they only check case length and don’t ‘re-size’ their brass. They say therefore>that they don’t experience the hardening of the brass…

What say some of you regarding this?
I’m a full length sizer and case trimmer. I have yet tried the annealing process…January 27, 2014 at 8:15 pm #1352425
There are a many theories on resizing and reloading
My only opinion is that as long as every piece of brass is resized the same with no shortcuts, then prepped and reloaded the same. The end result will be the same as far as accuracy.
All my ammo is full length sized with neck bushings used for the proper neck tension I need
All brass after being sized will be trimmed for length – thus being the same for a consistent release under pressure.
Folks can load and take many shortcuts or get lazy with the process with good success yet will have fliers that the wind must of pushed or the yardage was off a little or the scope, the rifle, and on and on, some will have a lot of reasons if they have to print it on a paper or steel target. Sooner or later it catches up. Some just get lucky. But in time it weeds out, and the folks who are a little picky about the process have less issues.
Annealing? – every time a piece of brass is fired in a rifle and then the neck is resized for another bullet be it full length resizing or only neck sizing the neck area of the brass gets harder –more brittle and less responsive to sizing with this an inconsistence tension upon release.
The annealing process which I do every round softens the neck and shoulder area to extend the useful life of the brass, maintains a more consistent neck tension while seating bullets as well as upon release while building pressure. It pays for itself big time with consistent accuracy down range when depended on, less time and money spent with load development maintenance and saves money when being able to stretch out the useful life on expensive brass, heck any time you can save a little it adds up, doesn’t have to be high-end brass.
It may be that some folks except a rifle that shoots 2 moa or even 1 moa at close ranges and figure it’s the rifle or shooter that opens up when at 300 yards or more and that is just the way it is. These folks would not really care about all the tech info for the most part.
I run into many farmers in my job that bring up the shooting subject and when you mention to them that you shoot at small targets at 500 out to 2000 and beyond they think you’re a whack. For the most part most folks think 300 yards is crazy. So here again they may be right because of what they have to work with. Yes we have some expensive rifles some not some more, but with that most of you know that there are a few factory off the shelf rifles that won’t break the bank that shoot lights out.
I probably have rambled on to long again,. Hope some of this helps
Cheers
JeffJanuary 27, 2014 at 8:54 pm #1352426Jeff H

I may never shoot 2000 but when I was in the service 300 didn’t give me much trouble. 500 was kinda fun, I say that because the targets didn’t breathe
thanks


You must be logged in to reply to this topic.
