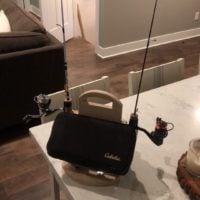
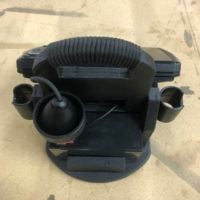
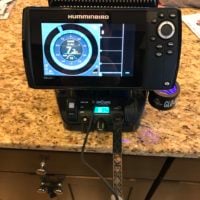
Let's see your DIY Helix Shuttle!!!

  • luttes
    Maplewood/WBL
    Posts: 542
    #1805688

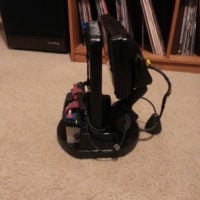
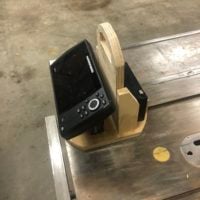
    I just finished this one. Used black truck bedliner spray paint. Don’t have a picture of the finished and painted.

    Looks great Jeff! Does it fit in a 5 gallon bucket? or was that not your goal? Looks like at least a helix 7, right? Is it top heavy at all?

    gotalunker
    Zimmerman, MN
    Posts: 153
    #1805697

    As long as your power source is able to put out 12-14vDC at a minimum rate of 800mA, then you should be just fine with a battery pack like that. Keep in mind though that this has a capacity of about 6Ah, which means that capacity may prove to be an issue because the Helix 7 on brightest screen setting will draw about 700-800mA. On the lowest setting it’s about 250mA.
    You would almost be better off buying a 9Ah battery for less than the price of that pack because a 9000mAh battery has more capacity than a 6000mAh battery. PM me if you have further questions…I can help with as much detail as needed.

    Brandon S
    Posts: 38
    #1805889

    Sorry to go off topic a bit, but I have a gen 1 Helix 5 di/si that I’ve been using in the summer. Anybody using one on the ice; if so how does it perform? Sounds like I would need the #20 ice ducer, as it’s not chirp? I have a Fl-18, and was thinking of selling it, if the original Helix works alright. Thanks

    muskie-tim
    Rush City MN
    Posts: 838
    #1805909

    I’m running a standard 9Ah SLA battery. seems to work fine. Haven’t fished a whole day with it, but I can say that the numbers appear to suggest it should last.
    The biggest thing is the screen brightness. on brightness 10 the helix 7 draws about 750mA. on brightness 2-3 about 300mA. So the point is, turn the screen down and you’ll get significantly more battery life.

    Gotalunker,
    So after a season on the ice with the 9Ah SLA battery did you find that the battery would last a whole day? Makes sense that turning the screen brightness down would help.

    Getting ready to build a shuttle and am wondering if you would consider going with a lithium battery if starting over again?

    Thanks

    gotalunker
    Zimmerman, MN
    Posts: 153
    #1805911

    Good question!

    Ran it all last season and don’t recall having issues with battery life to any significant extent. And by that I mean: As long as I wasn’t trying to run full screen brightness all day and then try to run well into the evening too. In that scenario, the daytime run and gun did present a few issues just because I was using it as a GPS to move around and as a sonar. Those days I was able to solve the problem as the sun was going down by just having a second battery on hand and swapping out. That said, not sure the additional cost would be worth it to go lithium even though maybe the weight savings would be nice.

    Coincidentally, the only other issue I had, I had to send the unit to HB for warranty repair.
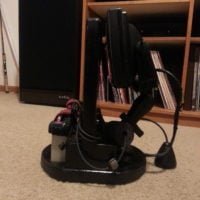
    Captainpaddlefoot
    Green Bay
    Posts: 219
    #1805917

    Lunker,
    What about running with the black screen background instead of or with turning down the backlight?

    Can we shut off the GPS on the Helix?

    I have another unit mounted on my ATC for GPS or phone when I need to pinpoint when on foot.

    Captainpaddlefoot
    Green Bay
    Posts: 219
    #1805922

    Going with regular battery. Figured out getting it all in 5 gallon pail I hope.

    Just a word on making your own shuttle vs buying Humminbird ice shuttle. My home made Cost $215 with ram mount and pvc.

    Didn’t save much. but, like fishing with stuff i make for my purposes.

    gotalunker
    Zimmerman, MN
    Posts: 153
    #1805927

    Captain,
    Yes, you can run in standby mode…that will help save battery
    No, you cannot shut off the GPS.
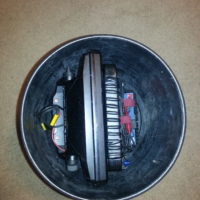
    I can easily fit mine in a 5 gallon pail and only cost me about $20 or $30 bucks for materials. I modeled the shuttle exactly after the shuttle for the Ice 35-55 units. With the ram mount, I can turn the screen and it works perfect.
    Will post another pic in a few minutes.

    gotalunker
    Zimmerman, MN
    Posts: 153
    #1805930

    A couple more pics

    Attachments:
    1. 20181026_081303.jpg

    2. 20181026_081313.jpg

    Captainpaddlefoot
    Green Bay
    Posts: 219
    #1805937

    I would say overkill could describe mine. Will post pictures when done. My cost includes everything, ducer, ram, battery, gimbal, cord. Ordered everything yesterday. Will take up to 2 weeks to get everything. Went with cheapest supplier and no shipping.

    Branden Visser
    Posts: 31
    #1805942

    My rough draft. Nothing glued or screwed yet. Trying to get ideas on how to store transducer and chord!

    Attachments:
    1. CF4F6927-C3B7-47F4-8438-C0E5B3EF210F.jpeg

    2. F934D678-9B2F-4595-934B-861B9CB8C412.jpeg

    Captainpaddlefoot
    Green Bay
    Posts: 219
    #1805965

    That is why I went with ram mount. Storing the transducer under the unit and I think I will use a pail of screw in tools bent 90 degrees on the side of the handle.

    luttes
    Maplewood/WBL
    Posts: 542
    #1805966

    My rough draft. Nothing glued or screwed yet. Trying to get ideas on how to store transducer and chord!

    Looks Great Brandon! Just make sure that you’re going to be able to put it in a 5 gallon bucket with the gimble mount if that’s you’re end goal. It would stink if you got it all done and painted and then it didn’t fit! But you’re off to a great start!

    Tuma
    Inactive
    Farmington, MN
    Posts: 1403
    #1805967

    My rough draft. Nothing glued or screwed yet. Trying to get ideas on how to store transducer and chord!

    I wrap the cord around the handle. You can make an indent in the sides to help hold the cord. For the transducer I glued a small chunk of PVC to hold it.

    Branden Visser
    Posts: 31
    #1805968

    Def not going to fit in a 5 gallon bucket. :/ this is just a test run with the unit, if I like it this season, I’ll build something a bit nicer with a ram. Going to add some pvc rod holders and a Velcro strap to hold battery in. Probably will add an LED strip under the unit and get some plastic vacuum chord wrappers for under the unit for the transducer cable. I think….

    luttes
    Maplewood/WBL
    Posts: 542
    #1805973

    Def not going to fit in a 5 gallon bucket. :/ this is just a test run with the unit, if I like it this season, I’ll build something a bit nicer with a ram. Going to add some pvc rod holders and a Velcro strap to hold battery in. Probably will add an LED strip under the unit and get some plastic vacuum chord wrappers for under the unit for the transducer cable. I think….

    awesome! Good start so far! Let us know if you have any questions or need any advice!

    gotalunker
    Zimmerman, MN
    Posts: 153
    #1805983

    Adding on to my previous pics and posts. This one shows how nice my Helix 7 and DIY shuttle fit in a bucket.

    Attachments:
    1. 20181026_101225.jpg

    Jeff mattingly
    Lonsdale, Mn
    Posts: 515
    #1806000

    <div class=”d4p-bbt-quote-title”>Jeff mattingly wrote:</div>
    I just finished this one. Used black truck bedliner spray paint. Don’t have a picture of the finished and painted.

    Looks great Jeff! Does it fit in a 5 gallon bucket? or was that not your goal? Looks like at least a helix 7, right? Is it top heavy at all?

    It does not fit in a five gallon bucket. I haven’t tried turning the helix 7 around 180 degress, maybe it would fit then. It’s not too heavy at all. The circular base I made fits the bottom of a 5 gallon bucket though.

    Branden Visser
    Posts: 31
    #1806069

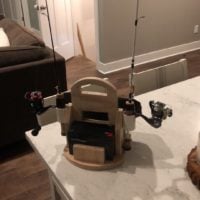
    Waiting for the transducer to make a holder for it but I think I’m ready for paint. Really pleased with how balanced it is. My Marcum wants to tip forward so bad when carrying it in the case! Added a marine chrome cleat that I cut in half for transducer chord management and a couple rod holders. Gotta add some rubber feet on the bottom and it’s game time! Probably have $15 into it.

    Glad I stumbled upon this thread before I bought a bird bag… $$$$$

    Attachments:
    1. E22228E7-F67C-4206-8D8E-D8898163FDC4.jpeg

    2. 119EB24B-FAFC-4F38-BDB3-B06E39EEE823.jpeg

    3. FF77A0E8-E77B-4B93-A851-4208F3ABF33E.jpeg

    luttes
    Maplewood/WBL
    Posts: 542
    #1806394

    Waiting for the transducer to make a holder for it but I think I’m ready for paint. Really pleased with how balanced it is. My Marcum wants to tip forward so bad when carrying it in the case! Added a marine chrome cleat that I cut in half for transducer chord management and a couple rod holders. Gotta add some rubber feet on the bottom and it’s game time! Probably have $15 into it.

    Glad I stumbled upon this thread before I bought a bird bag… $$$$$

    Awesome Job Branden! I really like the cleat idea! The Rod holders look really nice too! that’ll be an awesome addition to your hard water arsenal this year!

    Branden Visser
    Posts: 31
    #1809150

    Ready to roll!

    Attachments:
    1. 9BEBF00E-2A21-46F2-94B8-7A1FB90FD6BB.jpeg

    2. AAB35DDB-E7CD-42B7-A84C-CCAFD1CFD2BE.jpeg

    gotalunker
    Zimmerman, MN
    Posts: 153
    #1809184

    Looks great! Ready for ice!!

    Jamin
    Hudson, WI
    Posts: 925
    #1809453

    Not as DIY as many of the other cool ones here. But, here is the identity crisis monster I’ve assembled for 2018/19.

    Attachments:
    1. 249D235D-2C3C-48B3-8199-1FD9E6484BB7.jpeg

    BFrizz
    Posts: 4
    #1809466

    Nice!! I should have gotten the 7, doh!!
    I need to get the Marcum cable stop this year too.

    Jamin
    Hudson, WI
    Posts: 925
    #1809487


    I need to get the Marcum cable stop this year too.

    I was wondering how well (if) it fits on the HB cable. Definitely would be nicer than the bridging the HB one like I’m doing now.

    B-man
    Posts: 5944
    #1809502

    Not as DIY as many of the other cool ones here. But, here is the identity crisis monster I’ve assembled for 2018/19.

    Have you played with the Glo ring much?? How well does it charge stuff?

    Jamin
    Hudson, WI
    Posts: 925
    #1809503

    I’ve tested a few jigs and spoons. It’s UV light so it really makes them glow. And quickly. But duration of glow seems to be really dependent on paint quality. Some seem to glow much longer than others.

    For $25 I was willing to give it a shot. I like that it’s open bottom so it doesn’t collect water and works as a third rod holder too.

Viewing 30 posts - 91 through 120 (of 234 total)

You must be logged in to reply to this topic.