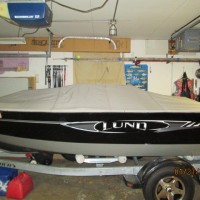
My present cover is getting rough and am going to have a new cover made for my 182TS Cliner. My debate is staying with the center poles to support the cover or with Bows this time. What is the consensus of which is better for keeping the cover from flopping when running down the Interstate and ease of putting the cover on?
IDO » Forums » Fishing Forums » Toys for Big Boys » Outdoor Gear Forum » Having a new boat cover made ?
Having a new boat cover made ?
-
January 31, 2016 at 6:04 am #1596752
Tom,
I haven’t had a cover that used the poles but I’ll guess they last longer because they take out the slack in the cover.
The guys over at Top Gun have been making covers for years and have very good reviews. They recommend poles (at least for most boats).
Whether you end up getting a cover from them or not, I would suggest giving them a ringy ding and ask.
BK
January 31, 2016 at 6:30 am #1596755Tom,
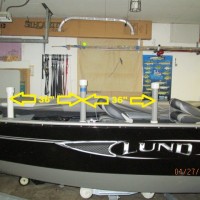
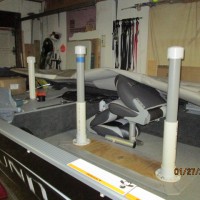
I had a conversation with TopGun this past week, on a similar subject. IMO, bows are a PITA, since they always seem to invert, and I’m not willing to fight trying to put the cover on and hold poles in position at the same time.Below is my (temporary) solution, I use one pole slid over the bow seat pedestal, the center and rear supports slide into a removable base that I’ve created. My intent, once I finalize locations, is to put small 3/4″ pin seat bases on the floor, and use a short pedestal & PVC pipe w/mushroom cap.
I just don’t want to fight putting the cover on, and holding poles in location at the same time. I just want to drape it over the supports, snap in on, and be done.
HRG
January 31, 2016 at 6:50 am #1596762my best travel cover was with bows on my Alaskan 18. Having the support all the way across kept it from becoming a parachute at 70mph. Key was to have the bows spaced adequately to give support where it was needed
January 31, 2016 at 7:28 am #1596767I vote for staying with the poles. I’ve had both styles in the past and I prefer the poles primarily for the venting the pole toppers provide. My boat sits outside all the time and these vents allow the moisture to escape even while the cover is in place. I don’t have to fight keeping the poles in place because I use a floor socket similar to what HRG is describing. My poles fit snugly into the upper vent, no fighting with that, the poles stay locked into the cover. The lower end of the poles can’t kick around as they fit into a recessed pocket in the floor.
The ID of the socket is a loose fit for a standard support pole. The depth is same as the floor thickness (no worries about under floor ribs). The upper lip is about 3/16 thick, so not a tripping hazard. I don’t have an actual photo because my boat is in cold storage at the moment.
 BassBuster2
Posts: 178January 31, 2016 at 7:30 am #1596770
BassBuster2
Posts: 178January 31, 2016 at 7:30 am #1596770That is a cool idea with the pvc , I have one ? Do they fall over much when tarping the boat?
BassbusterJanuary 31, 2016 at 8:29 am #1596779I can recommend Lake Area Marine Canvas in Chisago, MN if you’re going full custom. They’ve done both new covers and repairs for me.
They are experts in assessing the situation as regards supports. There’s also the issue of where to place supports to get optimal drainage so the water gets over the rail rather than pooling. You want to plan this ahead of time so the new canvas can be reinforced at the points where the canvas will contact the supports.
I like the PVC idea. Personally, I’ve always constructed a custom-height small “sawhorse” for the same purpose. Once installed, the canvas pushes the support down so it cannot tip over. Then I’d just put it in the back of the SUV when we got to the ramp.
Grouse
January 31, 2016 at 8:59 am #1596783That is a cool idea with the pvc , I have one ? Do they fall over much when tarping the boat?
BassbusterIt’s hard to see in the picture, but the 2 bases and short white sections are attached to a 1′ x 4′ piece of plywood (that I’ve covered in vinyl). The grey sections w/caps just drop-in. I made it like that so it’s easier to remove and store, the base section fits nicely under my trucks lid.
HRG
January 31, 2016 at 9:13 am #1596785The ID of the socket is a loose fit for a standard support pole. The depth is same as the floor thickness (no worries about under floor ribs). The upper lip is about 3/16 thick, so not a tripping hazard. I don’t have an actual photo because my boat is in cold storage at the moment.
Dave,
Any idea where that floor socket came from, I’m not able to find something like that.Here’s the pin base I’m thinking of using, only 3″x 4″, but I’ve got to pull the floor panel and make sure it will clear the gas tank.
HRG
January 31, 2016 at 10:14 am #1596790Dave,
Any idea where that floor socket came from, I’m not able to find something like that.Yes, I made it. I turned these up on a lathe at my place of employment. I too could not find a commercially made pole socket like I wanted. Your idea using those bases is probably the closest thing to what I made. I just wanted NO protrusion beyond the floor thickness so I did not have to look for any underlying ribs. For the price of those bases, I’ll bet you could find someone or a small shop to turn you up a couple custom inserts to put in your floor, that would accept a standard diameter support pole. I made mine out of aluminum. Made the OD of them such that I could use a hole saw and they would push right into the resulting hole in the floor.
PS: The inserts I made have a small hole all the way thru so they will drain. The fit to the pole diameter is loose so the poles will easily lift out yet close enough it size to keep the pole close to vertical when putting the cover on the boat. The whole idea of my inserts was driven by the need to keep the support pole in position should the cover lift a bit while going down the highway. There have been times in the past when my cover has lifted a bit (passing semi) then when it settled back down the pole kicked out and the cover would collapse in that area. Having the inserts has allowed me to run with less tension on the cover and snaps, thus making the cover easier to install. Now my cover only needs enough tension to keep the pole from completely lifting out of the floor socket. Before, the cover had to be tight enough to keep the poles always contacting the floor.
(hope this makes sense)January 31, 2016 at 11:03 am #1596794<div class=”d4p-bbt-quote-title”>Hot Runr Guy wrote:</div>
Dave,
Any idea where that floor socket came from, I’m not able to find something like that.Yes, I made it. I turned these up on a lathe at my place of employment.
(hope this makes sense)I soooo miss having a “worK” shop at my disposal. Understand completely what you wanted to accomplish.
Thanks, HRG
February 1, 2016 at 7:41 pm #1597176Thanks for the input I really like the way my cover fits it never balloons or flaps, considering the boat is a 2000 the cover has stood the test of time.
My current set up is poles once I learned to snap down the very front and very rear of my cover then stand the poles up, get out of the boat and finish snapping it down. My only consideration of going with bows is in the spring mud there is no reason to have to get into the boat to get the cover on. Just bugs me having mud and dirt foot prints in the boat especially since it has tan carpet. Even with my heated garage it is not the best idea to wash down the carpet vacuum picks up most but still have the stains there until spring comes and a pressure washer to rid the boat of slime and grime.
I am guessing I will stay with the poles and stay the course.
February 2, 2016 at 5:18 am #1597220Tom,
If I have a buddy with me, he can hand me the cover before I ever leave the boat. Using the inserts I have in the floor and while still in the boat I can hook the front edge of the cover over the very tip of the bow, then insert the three poles into their respective sockets. Next is to step out of the boat and secure the cover around the edges. I never have to get back into the boat because the poles are already in position. It works for me.
You must be logged in to reply to this topic.


