2013 mercury 40 hp 4 stroke overheating alarm

  • Tal Guidry
    Posts: 5
    #2072034

    Got in too skinny of water and the motor spit out mud. The telltale was not what it should be but it ran fine with no alarm…ran skinny again this time in sand and shell..alarm went off..shut it down…got towed in… flushed with earmuffs with no problem….most places i read were 50/50 with tear it down vs just flushing with ear muffs as well as backflushing….what say ya’ll..tia

    mark-bruzek
    Two Harbors, MN
    Posts: 3863
    #2072049

    I used to run through lots of gravel and sediment when I used to duck hunt. That stuff is torture on impeller pumps.
    I would be looking at replacement and hope you dont have a chunk of rubber blocking a water passage.

    Tal Guidry
    Posts: 5
    #2072091

    I used to run through lots of gravel and sediment when I used to duck hunt. That stuff is torture on impeller pumps.
    I would be looking at replacement and hope you dont have a chunk of rubber blocking a water passage.

    so i will take it apart. Do you or anyone else know how to disconnect the shaft linkage in this motor? Other than that it looks pretty straightforward…..

    Jon Jordan
    Keymaster
    St. Paul, Mn
    Posts: 6013
    #2072095

    It will just pull apart. Make sure to put the motor in forward gear before dropping the lower unit. Youtube is your friend. waytogo

    -J.

    TheFamousGrouse
    St. Paul, MN
    Posts: 11588
    #2072106

    Unless the inner pump housing where the impeller vanes ride is rough and damaged, you can just buy the impeller alone from Mercury and that’s all that is necessary to replace. Mercury parts are so damn expensive, don’t give them any more money than you need to by buying a whole pump assembly. And yes, I’ve used the Atwood impellers and they work just fine.

    When taking the water pump apart, note which way the impeller vanes “bend” or flex. Make sure you get the new impeller installed with the vanes bent or flexed the same way. Mercury outboards have a longer impeller vane than other brands and are a real SOB to get the impeller inside the housing, but be patient and work the vanes in, it will eventually fit.

    Also, remove your intake screens down at the lower unit and make sure they aren’t plugged with mud. There is a fine screen behind the “grill” on these, so you need to inspect them carefully to make sure that screen is not plugged.

    Do yourself a favor and put anti-seize on the threads of the lower unit bolts and on the splines on the top of the drive shaft when you put it back together. The lower unit bolts are notorious for seizing in place and turning a quick impeller job into an hours-long marathon of agony. I had an Merc in the shop once that I couldn’t budge even one of the lower unit bolts and after a bad experience with breaking one off, I was super cautions about a repeat. It took a week of zesty Deep Creep marinade to work them loose. All this can be avoided with AS compound.
    tim hurley
    Posts: 5825
    #2072126

    “… hours long marathon of agony”
    Dang, don’t like the sound of that!

    Iowaboy1
    Posts: 3787
    #2072154

    Just adding on to what Grouse has already said I would also pull the thermostat housing and make sure no mud/debris is packed in it, the passage through the stat isnt very big and plugs easily on most motors.

    As far as rolling the impeller in, put a little dielectric grease in the cup and smear it around the edges and top of the cup, you will be able to roll it right in with little effort.
    The dielectric grease also gives it a fighting chance on initial start up to start pumping immediately.

    Clock the keyway in the impeller towards the prop side of the lower unit and do the same with the driveshaft, when you slide the housing assembly down the shaft this saves the trouble of lining things up as you know where you are already headed.
    A dab of dielectric grease on the back of the key will help hold it in place on the shaft.

    Tal Guidry
    Posts: 5
    #2072175

    Thanks for the replies…whereabouts is the thermostat?

    Iowaboy1
    Posts: 3787
    #2072203

    With the top cowling removed, look at the starboard side of the engine near the top of the exhaust cover plate.
    the thermostat housing will have two bolts holding it down.

    if you need help finding a new gasket and I would suggest a new thermostat while you are at it send me a pm with your serial number and I will look those parts up for you and give you the link where you can buy them.

    TheFamousGrouse
    St. Paul, MN
    Posts: 11588
    #2072205

    “… hours long marathon of agony”
    Dang, don’t like the sound of that!

    It likely won’t be an issue taking apart on a 2013. And it’s only agony if you bust them off, so be careful. But my point is by putting anti-seize compound on the bolts upon reassembly, the OP prevents having a problem down the line when the water pump needs to be changed again.

    I’m always trying to make it easy on the next guy in hopes that cosmic karma somehow brings it back to me. So far, I’ve gotta tell you, it’s been a negative ROI, but I live in hope…

    tim hurley
    Posts: 5825
    #2072230

    Great points as usual FG, mostly moved by your verbage applause

    David Bollig
    Posts: 66
    #2072239

    Regarding checking the thermostat for blockage. Two falls ago I prepared to change the oil in my 2001 70HP Evinrude (Suzuki) 4 stroke. pulled out the plug and out shot a fluid that looked like a milkshake. The milkshake appearance was due to more than a 1/2 quart of water in the oil. I panicked thinking head gasket or some very expensive issue. Took it to Miller Marine in St Cloud. Their finding, a thermostat stuck open with gravel. I did a lot of late fall trolling then and due to the stuck open thermostat the motor never warmed up enough to eliminate condensation in the crankcase, so it just built up. Replaced thermostat, every fall oil change back to normal. This is a piece of good advice for changing out oil in fall rather than spring.

    Karry Kyllo
    Posts: 1267
    #2072321

    Regarding checking the thermostat for blockage. Two falls ago I prepared to change the oil in my 2001 70HP Evinrude (Suzuki) 4 stroke. pulled out the plug and out shot a fluid that looked like a milkshake. The milkshake appearance was due to more than a 1/2 quart of water in the oil. I panicked thinking head gasket or some very expensive issue. Took it to Miller Marine in St Cloud. Their finding, a thermostat stuck open with gravel. I did a lot of late fall trolling then and due to the stuck open thermostat the motor never warmed up enough to eliminate condensation in the crankcase, so it just built up. Replaced thermostat, every fall oil change back to normal. This is a piece of good advice for changing out oil in fall rather than spring.

    The same thing happened to me on my 2010 Merc 9.9 Pro Kicker(4 stroke). I noticed milky oil and a higher level on the dipstick than normal when I checked the oil as I routinely do during the open water season late in 2020. I feared head gasket also but the first thing that I did was to replace the thermostat. After removing the old thermostat, I noticed that there were flakes of what looked like hard water scale that had lodged in the thermostat that appeared to be holding it open and not allowing it to close. I cleaned what looked like the same scale from the area around the thermostat inside the motor and installed a new thermostat. After cleaning the original thermostat and testing it opened and closed as it should, so now I have a backup.
    After a full season of use (I troll cranks alot), a thermostat stuck open looks to have been the culprit. I kept very close track of the oil level throughout this season and it never fluctuated nor did I ever notice any sign of water in the oil on the dipstick. To my relief, I just dropped the engine oil in my kicker from this season and there was no trace of water.

    Tal Guidry
    Posts: 5
    #2072435

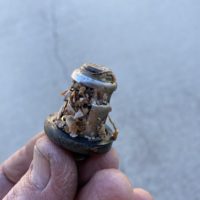
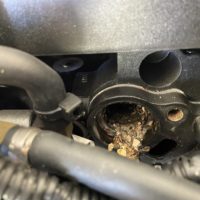
    Here is what i found.Question is can i backflush the rest if the debris from the telltale?

    Attachments:
    1. 47E5791D-08A4-49BB-A88F-1FDBF12685D7-scaled.jpeg

    2. 5BDE432F-B3FA-40E0-8C31-1EA88A2BAD43-scaled.jpeg

    Iowaboy1
    Posts: 3787
    #2072439

    hopefully you still have the lower unit removed, you can backflush from the stat opening backwards out through the water pump pipe.
    pull the hose off of the tell tale and wash back through it as well, keep alternating the flushes so you can get all of it flushed out.
    this includes flushing up through the pump pipe.
    That is nasty looking !!

Viewing 16 posts - 1 through 16 (of 16 total)

You must be logged in to reply to this topic.